
0 - Introduction
In this article, we’ll walk you through using an ESP32 with a photoresistor (LDR) to measure light intensity. You’ll learn how to connect the components, write the necessary code, and even calibrate your sensor to get semi-accurate light readings in lux.
1 - Hardware
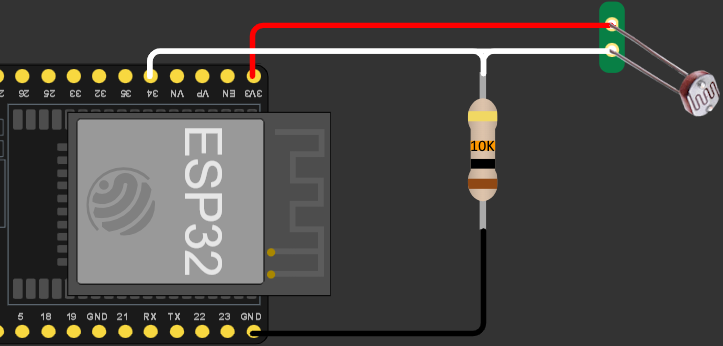
To follow this article you will need an Esp32, a 10K resistor and the photoresistor. Plug one leg of the photoresistor to 3.3V and the other both to the 10K resistor and pin 34, the other end of the 10K resistor, plug it into ground.
2 - Code
For the first code, we won’t need much. Start by including the Arduino header and, on setup, begin Serial and set pin 34 as input:
#include <Arduino.h>

void setup()
{
    Serial.begin(115200); // Setup Serial
    pinMode(GPIO_NUM_34, INPUT); // Set pin 34 as input
}
On loop, read pin 34 and print its value to Serial and then wait one second:
void loop()
{
    Serial.println(analogRead(GPIO_NUM_34)); // Log LDR
    vTaskDelay(1000 / portTICK_PERIOD_MS); // Wait 1 sec
}
And that’s it, you can now use the value from 0 to 4096 provided by the sensor to measure light.
3 - Calibration
If knowing a value from 0 to 4096 is not enough, and you need to know a lux value, we can calibrate our sensor by adding some lines of code to our main file. On setup, add a call to ‘adcAttatchPin’ with the sensor pin as its argument:
void setup()
{
    Serial.begin(115200);
    pinMode(GPIO_NUM_34, INPUT);
    adcAttachPin(GPIO_NUM_34); // attatch pin 34 to the adc
}
On loop, we will get the voltage and use it to calculate the resistance, then we log both values every second:
void loop()
{
    float v_voltage = analogReadMilliVolts(GPIO_NUM_34) / 1000.0; // get voltage
    float v_resistance = 10000 * ((3.3 / v_voltage) - 1); // calculate resistance

    Serial.printf("%f, %f\n", v_voltage, v_resistance);
    vTaskDelay(1000 / portTICK_PERIOD_MS);
}
We will then use these readings along with another meter to create the function that gives us the value in ‘lux’ from the resistance. For this you can either use a lux meter or, like I did, you can just use your phone, but keep in mind that it won’t be as accurate as a photographer grade meter.
There are lots of apps to measure light in lux, I used one named Light Meter, you can get it here on the play store. Log different values by covering the sensor, measuring the ambient light and pointing a light source to both sensors.
You will then need to go to Desmos. Create a table and put your Lux values on X and Resistance values on Y. Scroll down a little and select Power Regression. If you don’t see it, you might need to click on an icon at the top left of your table. After selecting Power Regression, enable log mode and copy the equation.
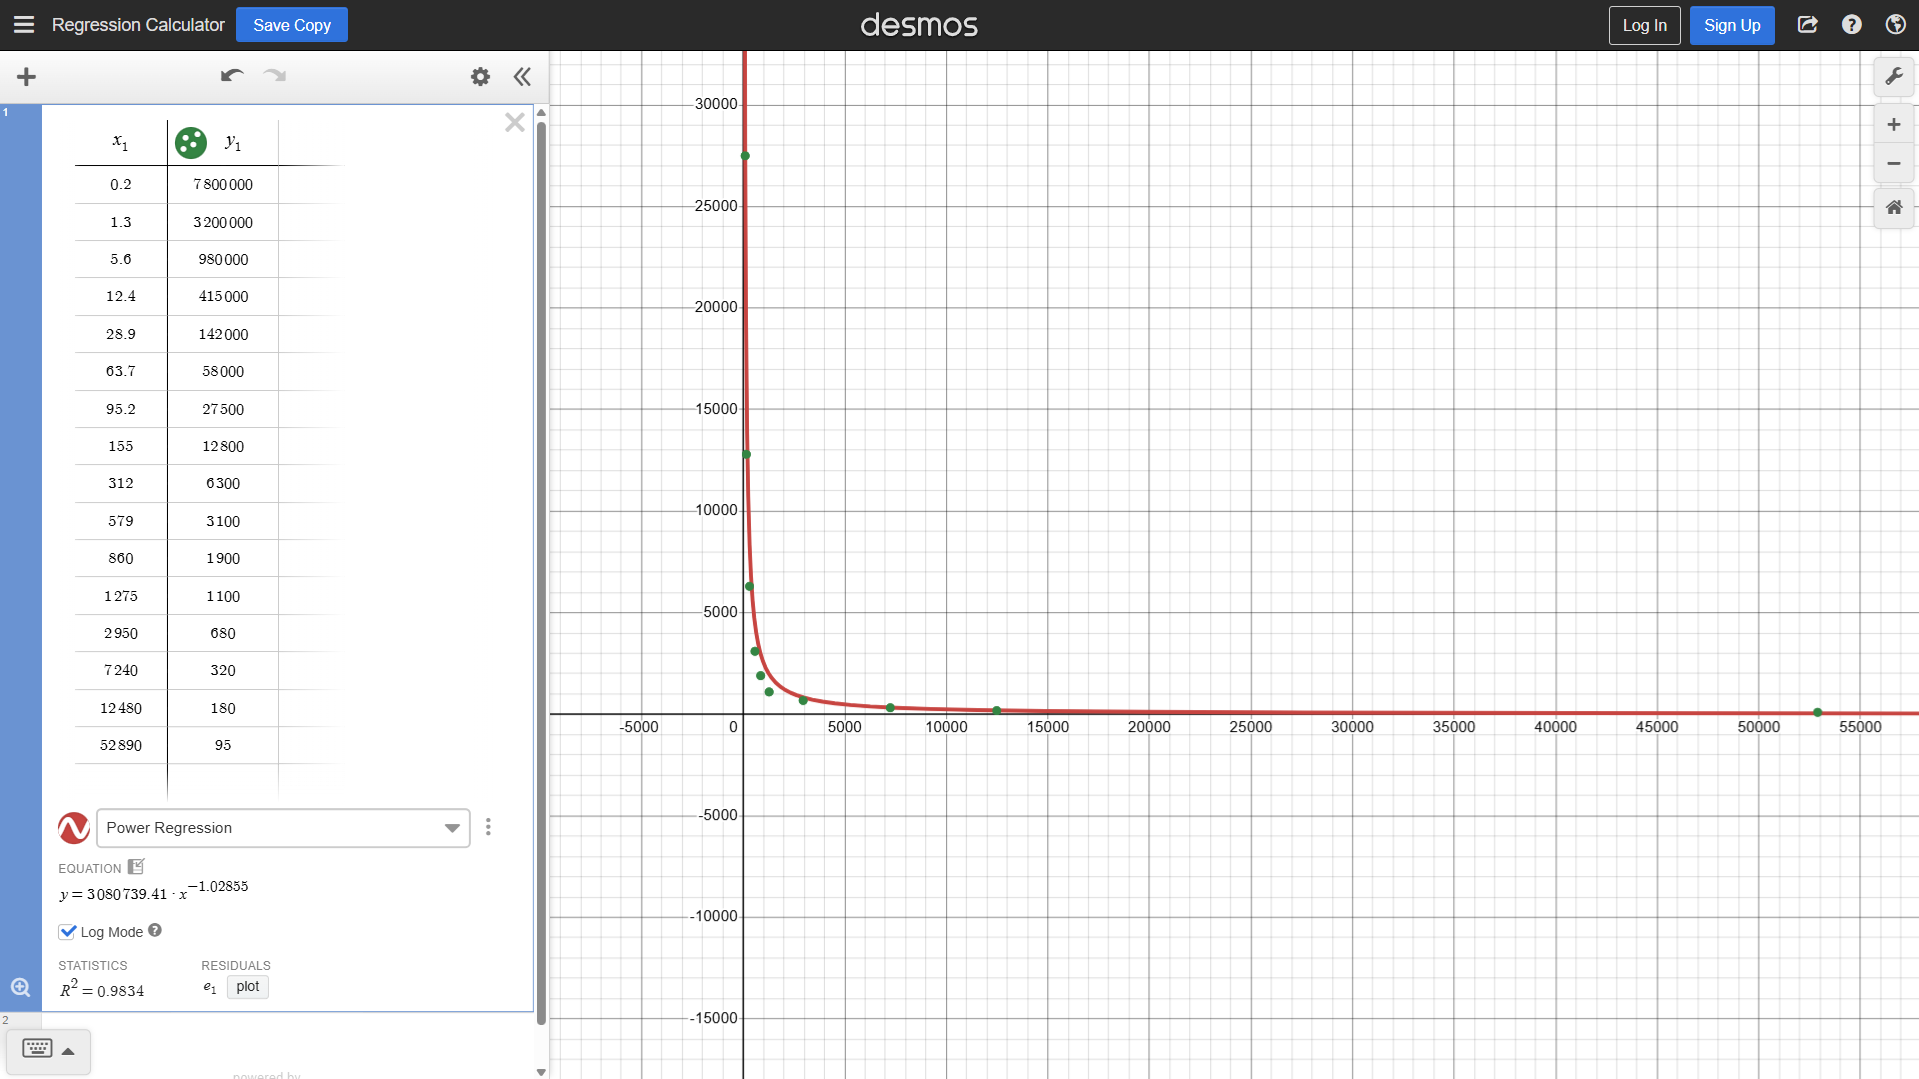
Now we need to transform this function so that it outputs Lux, to do that switch from:
to:
Using this formula, your code should look something like this:
void loop()
{
    float v_voltage = analogReadMilliVolts(GPIO_NUM_34) / 1000.0; // get voltage
    float v_resistance = 10000 * ((3.3 / v_voltage) - 1); // calculate resistance
    float v_lux = pow((v_resistance / 3080739.41), (1 / -1.02855));

    Serial.printf("%f, %f, %f\n", v_voltage, v_resistance, v_lux);
    vTaskDelay(1000 / portTICK_PERIOD_MS);
}
And this is how your code should look like running:
Thanks for reading, and stay tuned for more tech insights and tutorials. Until next time, keep exploring the world of tech!