
The ESP32 is a powerful microcontroller with built-in Wi-Fi, making it perfect for IoT applications. In this tutorial, we’ll show you how to control PWM (Pulse Width Modulation) from a web server hosted on the ESP32. By the end, you’ll be able to adjust an LED’s brightness using a simple slider on a webpage.
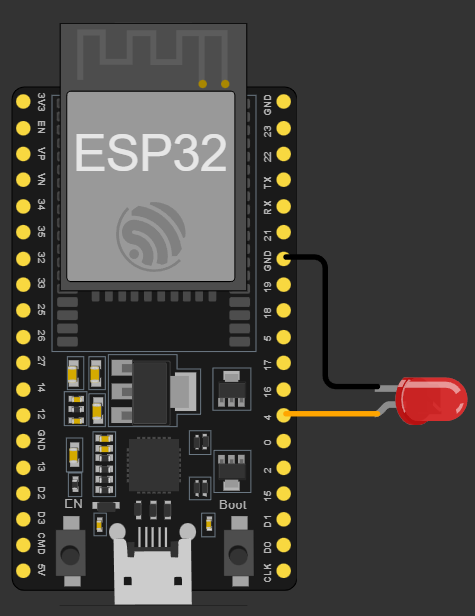
For this project, you will need an Esp32, an LED, some cables, and a USB-C cable. Connect the LED’s negative pin to GND and the positive to pin 4:
Before starting, make sure you have the PlatformIO IDE extension installed on VS Code. Then make a folder for your project and, in it, create a file named ‘platformio.ini’:
mkdir esp32-rc522
cd esp32-rc522
nano platformio.ini
In that file, paste the following configuration and then open VS Code:
[env:nodemcu-32s]
platform = espressif32
board = nodemcu-32s
framework = arduino
lib_deps = esphome/ESPAsyncWebServer-esphome@^3.3.0
code .This configuration should automatically install all Esp and Arduino libraries as well as the one we will use for our display.
For this program we will only need 2 headers, Arduino and the Async Web Server:
#include <Arduino.h>
#include <ESPAsyncWebServer.h>
We will also use this HTML Page from RandomNerdTutorials:
// Webpage code from https://randomnerdtutorials.com/esp32-web-server-slider-pwm/
const char index_html[] PROGMEM = R"rawliteral(
    <!DOCTYPE HTML><html>
        <head>
            <meta name="viewport" content="width=device-width, initial-scale=1">
            <title>ESP Web Server</title>
            <style>
                html {font-family: Arial; display: inline-block; text-align: center;}
                h2 {font-size: 2.3rem;}
                p {font-size: 1.9rem;}
                body {max-width: 400px; margin:0px auto; padding-bottom: 25px;}
                .slider { -webkit-appearance: none; margin: 14px; width: 360px; height: 25px; background: #FFD65C;
                outline: none; -webkit-transition: .2s; transition: opacity .2s;}
                .slider::-webkit-slider-thumb {-webkit-appearance: none; appearance: none; width: 35px; height: 35px; background: #003249; cursor: pointer;}
                .slider::-moz-range-thumb { width: 35px; height: 35px; background: #003249; cursor: pointer; }
            </style>
        </head>
        <body>
            <h2>ESP Web Server</h2>
            <p><span id="textSliderValue">%SLIDERVALUE%</span></p>
            <p><input type="range" onchange="updateSliderPWM(this)" id="pwmSlider" min="0" max="255" value="%SLIDERVALUE%" step="1" class="slider"></p>
            <script>
                function updateSliderPWM(element)
                {
                    var sliderValue = document.getElementById("pwmSlider").value;
                    document.getElementById("textSliderValue").innerHTML = sliderValue;
                    console.log(sliderValue);
                    var xhr = new XMLHttpRequest();
                    xhr.open("GET", "/slider?value="+sliderValue, true);
                    xhr.send();
                }
            </script>
        </body>
    </html>
    )rawliteral";
Then create two Strings, one for your network’s SSID and another for it’s password:
// WiFi credentials
const String wifi_ssid = "myssid";
const String wifi_pass = "password";

// LEDC
const int16_t pwm_channel = 2;
As for variables, we will need the Async Web Server and the value of the slider:
// Web server
AsyncWebServer ws(80);

// Vars
String sliderVal = "0";
This function also came from RandomNerdTutorials and its job is to add the value of the slider in the HTML page:
// Replace slider value in html code
String replaceVar(const String& var)
{
    if (var == "SLIDERVALUE")
        return sliderVal;
    return String();
}
In the ‘wifi_connect’ function, begin Wi-Fi and wait until it connects, if it does, print your IP, if it doesn’t in 15 seconds, log the failure:
// Connects to WiFi
bool wifi_connect()
{
    // Connect
    WiFi.begin(wifi_ssid, wifi_pass);
    Serial.printf("WiFi: Connecting to %s", wifi_ssid.c_str());
    while (WiFi.status() != WL_CONNECTED) // Wait until connected
    {
        Serial.print('.');
        vTaskDelay(100 / portTICK_PERIOD_MS);
        // Waited for 15 secs and no connection?
        if (millis() > 15000)
        {
            Serial.println("WiFi: Failed to connect (Timeout)");
            return false;
        }
    }
    Serial.printf("\nWiFi: Connected to %s (%s)\n", wifi_ssid.c_str(), WiFi.localIP().toString().c_str());
    return true;
}
On loop, we won’t do anything, because our Web Server is async. You can either leave this function empty or, like me, add small delay:
void loop() { vTaskDelay(1000 / portTICK_PERIOD_MS); }
Finally, on setup, begin Serial and connect to Wi-Fi. If connecting fails, reboot the Esp and try again:
void setup()
{
    Serial.begin(115200);

    // Connect to WiFi
    if (!wifi_connect())
    {
        Serial.println("Could not connect to WiFi, rebooting in 5 secs...");
        vTaskDelay(5000 / portTICK_PERIOD_MS);
        ESP.restart();
    }

    // ...
}
Then we need to register the handlers for our Web Server. If the root page is requested, send the HTML page. If the ‘slider’ page is requested, check if a value was provided, if it was, update the brightness of the LED and send OK, if no value was given, just send OK:
void setup()
{
    // ...

    // Add request handlers
    ws.on("/", HTTP_GET, [](AsyncWebServerRequest* req){ req->send_P(200, "text/html", index_html, replaceVar);});
    ws.on("/slider", HTTP_GET, [](AsyncWebServerRequest* req){
        String inp;
        if (req->hasParam("value")) // has value?
        {
            inp = req->getParam("value")->value(); // get value
            sliderVal = inp; // save it
            ledcWrite(pwm_channel, sliderVal.toInt()); // update LED brightness
        }
        else // no value sent?
            inp = "No message sent";
        Serial.println(inp); // log value
        req->send(200, "text/plain", "OK"); // reply with OK

    // ...
}
Then setup ‘LEDC’, attach it to pin 4, write it’s initial value (zero) and, finally, start the web server:
void setup()
{
    // ...

    // Start ledc
    ledcSetup(pwm_channel, 5000, 8);
    // Attatch to pin 4
    ledcAttachPin(GPIO_NUM_4, pwm_channel);
    // Write starting value
    ledcWrite(pwm_channel, sliderVal.toInt());
    // Start web server
    ws.begin();
}
Now upload your code, on your browser, type your Esp’s IP, and try changing the value on the slider!
And that’s all. Thanks for reading and stay tuned for more tech insights and tutorials. Until next time, and keep exploring the world of tech!