
Near Field Communication (NFC) technology is widely used for authentication, access control, and data transfer. In this tutorial, we’ll guide you through setting up an ESP32 with an RC522 NFC reader/writer to read and write data to NFC tags or cards. We’ll cover the required hardware, setup, and coding process using PlatformIO and Arduino libraries, providing you with a solid foundation for working with NFC technology in your projects.
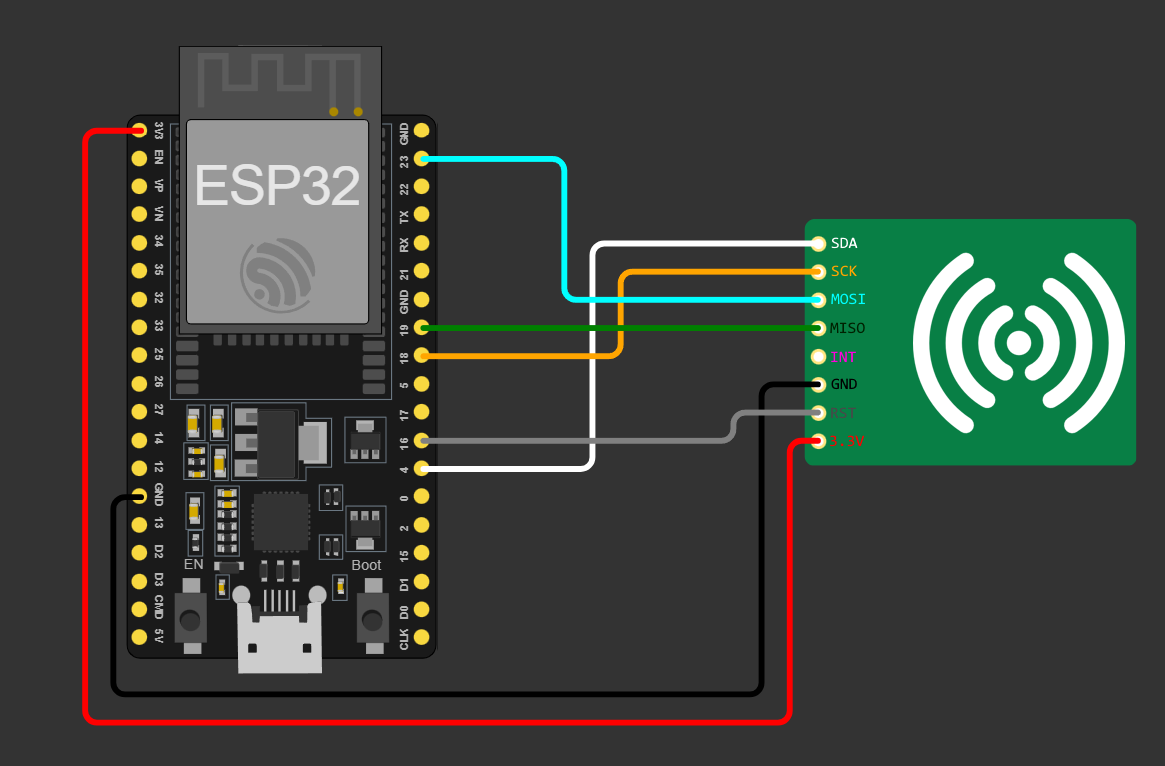
For this project, you will need an Esp32, a RC522 Module, a NFC tag, some cables, and a USB-C cable.
Before starting, make sure you have the PlatformIO IDE extension installed on VS Code. Then make a folder for your project and, in it, create a file named ‘platformio.ini’:
mkdir esp32-rc522
cd esp32-rc522
nano platformio.ini
In that file, paste the following configuration and then open VS Code:
[env:nodemcu-32s]
platform = espressif32
board = nodemcu-32s
framework = arduino
lib_deps = computer991/Arduino_MFRC522v2@^2.0.1
code .This configuration should automatically install all Esp and Arduino libraries as well as the one we will use for our display.
Let’s now write our program. Start by including the Arduino header file along with the module’s header, SPI driver, Debug and Pin:
#include <Arduino.h>
#include <MFRC522v2.h>
#include <MFRC522DriverSPI.h>
#include <MFRC522DriverPinSimple.h>
#include <MFRC522Debug.h>
Now we create an object of the class ‘MFRC522’ with the SPI driver and the CS pin set to 4:
MFRC522DriverPinSimple cs(GPIO_NUM_4);
MFRC522DriverSPI driver(cs);
MFRC522 mfrc522(driver);
On setup, initialize Serial, set pin 2 (reset) as high, initialize the reader and print the version to Serial:
void setup()
{
    Serial.begin(115200);

    pinMode(GPIO_NUM_2, OUTPUT);
    digitalWrite(GPIO_NUM_2, HIGH);

    mfrc522.PCD_Init();
    MFRC522Debug::PCD_DumpVersionToSerial(mfrc522, Serial);
}
On loop, check if a valid card is present and, if it is, dump it’s contents to Serial:
void loop()
{
if (!mfrc522.PICC_IsNewCardPresent())
return;
if (!mfrc522.PICC_ReadCardSerial())
return;
Serial.print("Card UID: ");
MFRC522Debug::PICC_DumpToSerial(mfrc522, Serial, &(mfrc522.uid));
Serial.println();
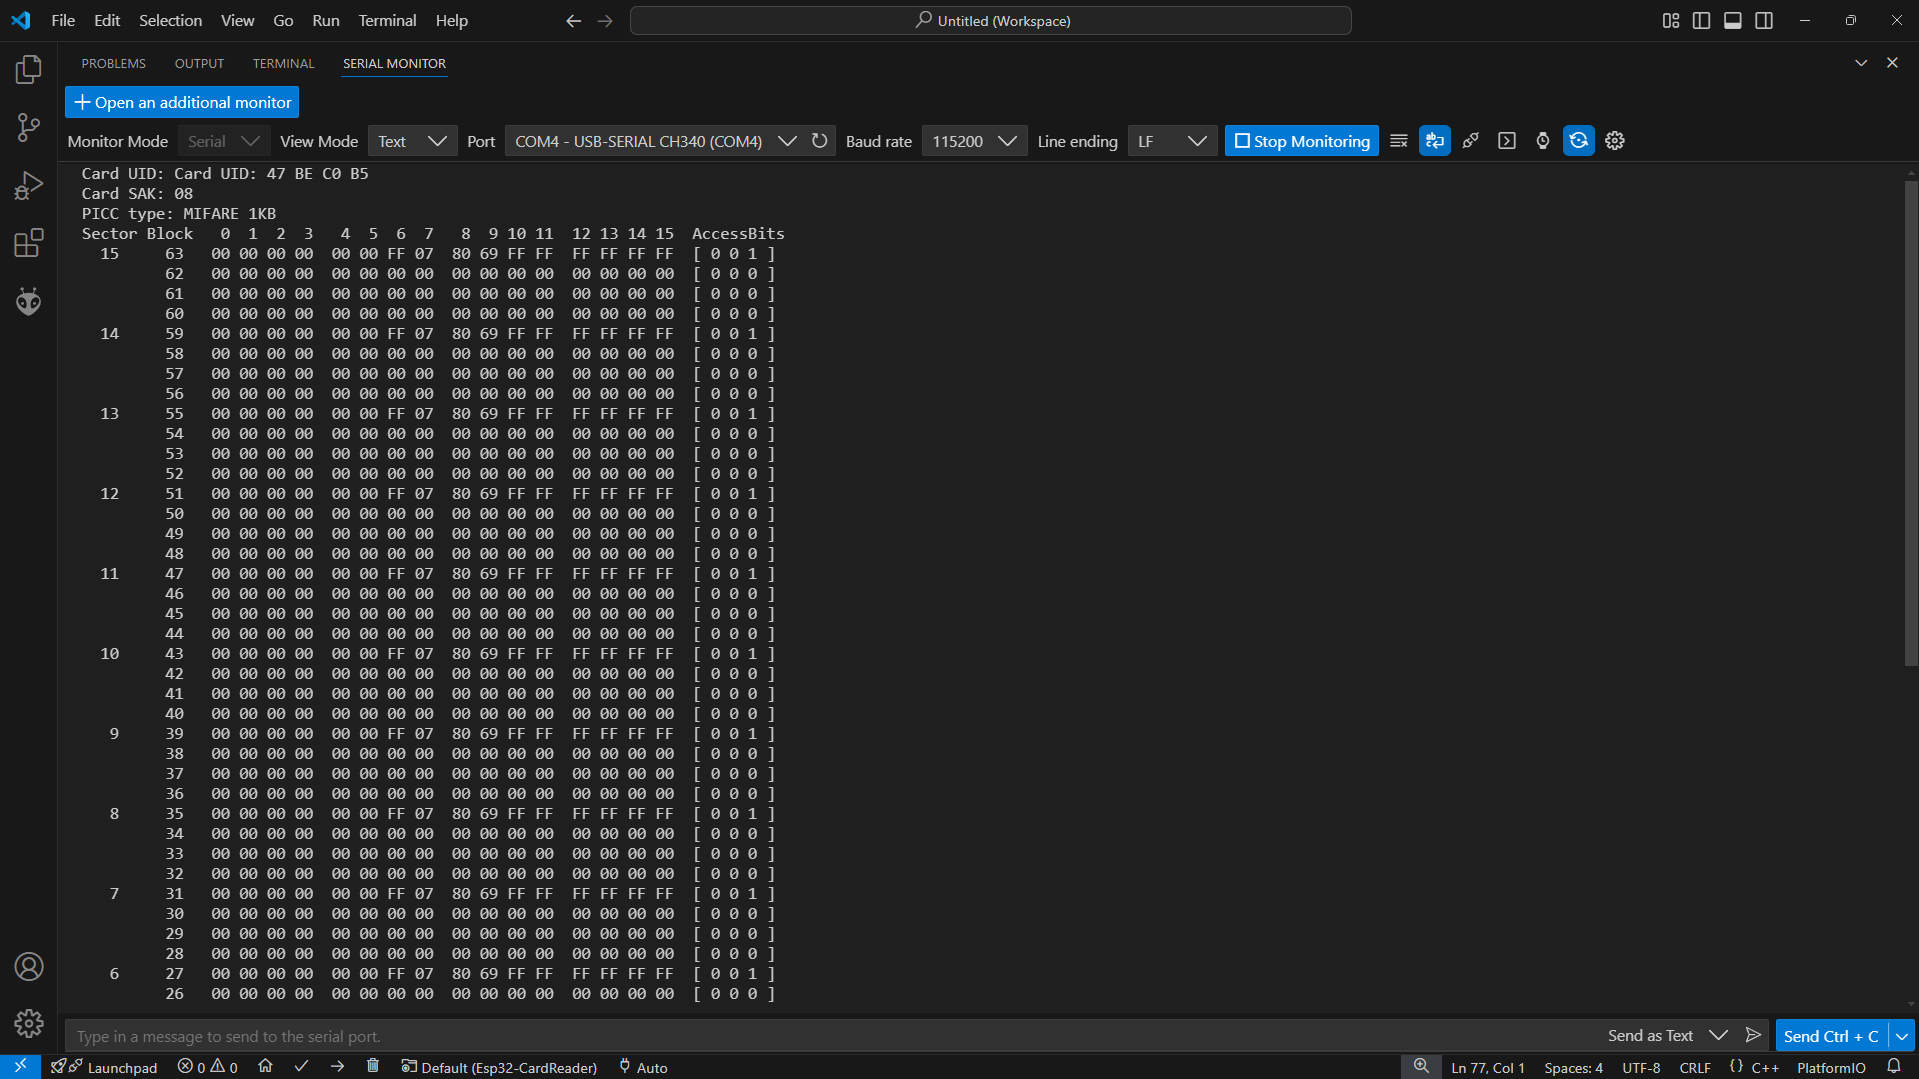
}Now upload your code and test the reader by putting a card near the reader. Your output should be similar to this:
Now let’s add the function to read a block from the card. We need to start by authenticating, we can do that by using the default key (6x 0xFF), if authentication succeeds, we then read the block into an array. Note that you only read 16 bytes but you need an array of at least size 18 because the return value is 16 bytes of data + CRC_A.
bool readCard(uint8_t block)
{
    MFRC522::MIFARE_Key key = {.keyByte = {0xFF, 0xFF, 0xFF, 0xFF, 0xFF, 0xFF}};

    if (mfrc522.PCD_Authenticate(0x60, block, &key, &(mfrc522.uid)) != 0)
    {
        Serial.printf("readCard: Could not authenticate block %u\n", (uint32_t)block);
        return false;
    }

    byte buf[19];
    byte size = 18;
    if(mfrc522.MIFARE_Read(block, (byte*)buf, &size) != 0)
    {
        Serial.printf("readCard: Could not read from block %u\n", (uint32_t)block);
        return false;
    }
    buf[18] = '\0'; // Safe for print

    Serial.printf("Read block: %s\n", (char*)buf);
    return true;
}To write to the card, we do basically the same. Authenticate and then write to the card. You always need to provide an array of 16 bytes, if you give less, writting will fail.
bool writeCard(uint8_t block)
{
    MFRC522::MIFARE_Key key = {.keyByte = {0xFF, 0xFF, 0xFF, 0xFF, 0xFF, 0xFF}};

    if (mfrc522.PCD_Authenticate(0x60, block, &key, &(mfrc522.uid)) != 0)
    {
        Serial.printf("writeCard: Could not authenticate block %u (%u)\n", (uint32_t)block);
        return false;
    }

    if (mfrc522.MIFARE_Write(block, (byte*)"Hello World\0\0\0\0", 16) != 0)
    {
        Serial.printf("writeCard: Could not write to block %u\n", (uint32_t)block);
        return false;
    }

    return true;
}
On loop, check if a card is present and working, write to it (in this case, block 4), then read that same block to see if it was written to, dump its contents to serial, stop communication with the card, stop authentication and wait a little:
void loop()
{
if (!mfrc522.PICC_IsNewCardPresent())
return;
if (!mfrc522.PICC_ReadCardSerial())
return;
writeCard(4);
readCard(4);
// This function will call 'PICC_HaltA', to re init the card you need to physically remove it from the reader
MFRC522Debug::PICC_DumpToSerial(mfrc522, Serial, &(mfrc522.uid));
// Basically stops connection with the card
mfrc522.PICC_HaltA();
// Needs to be called after using authentication and before connecting with a new card
mfrc522.PCD_StopCrypto1();
// Give time to remove the card from the reader
vTaskDelay(2000 / portTICK_PERIOD_MS);
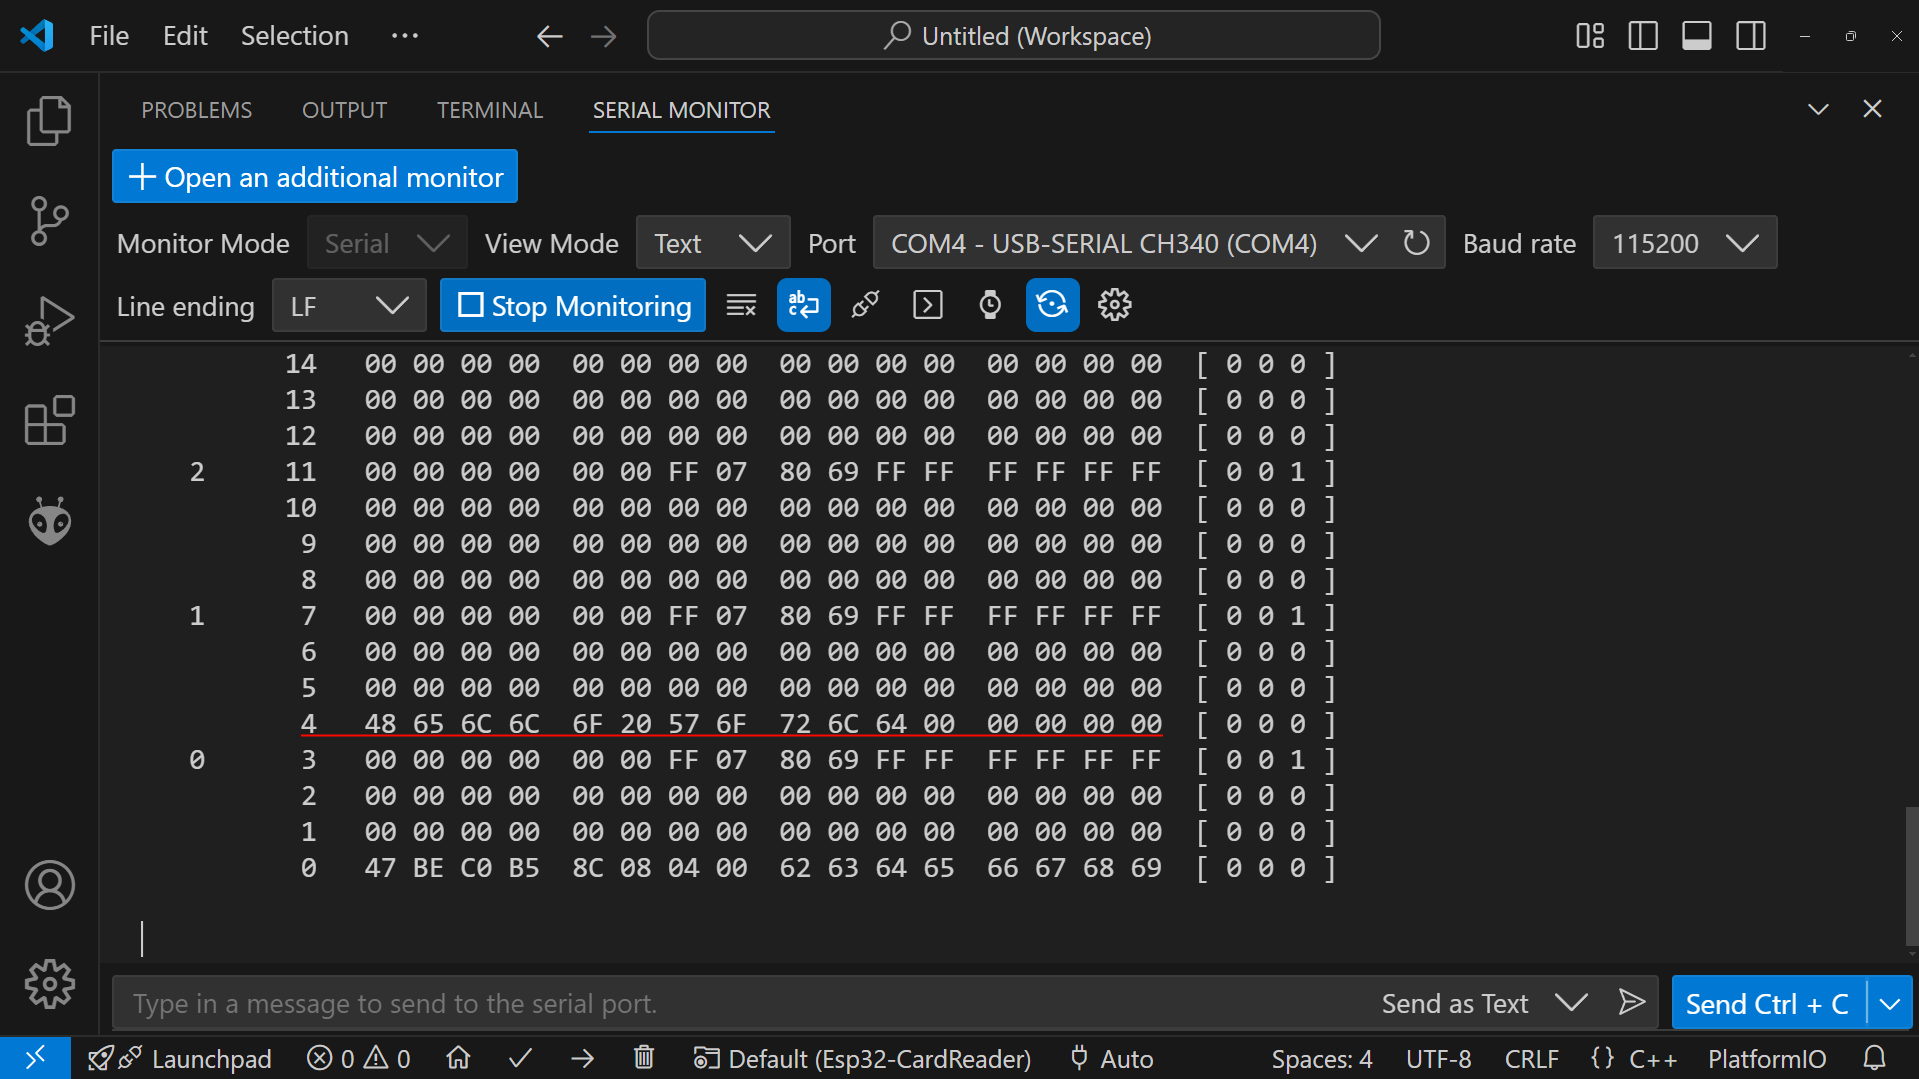
}By scanning a card now, you should see at the top of the log ‘Read block: Hello World’. If you check the dump, you should also see that sector 4 is different from last time, that is the data we wrote.

And that’s all, you should now be able to read and write to a NFC tag or card. Thanks for reading and stay tuned for more tech insights and tutorials. Until next time, and keep exploring the world of tech!